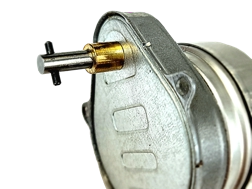
1. After removing old motor, mount new shaft on damper as
illustrated in Image 2. Cross pins on shaft will fit into
damper. Retainer strap (bendable strap with holes) will be
screwed onto damper to hold damper shaft in place. The
retainer strap will bend over the washers on the damper
shaft and not sit flat on the damper. Take care to place
brackets where shown to avoid self-tapping screws from
interfering with internal damper mechanisms.
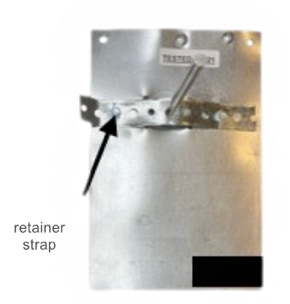
Note: If you are removing the motor from a rectangular damper with a 3150 RetroZone™ motor, you will need to remove the motor box or "fold" down the sides of the motor box so they are flat against the damper to be able to install the Belimo motor.
See Image 3.
2. If damper can be removed, then remove the spring from
inside of the damper since it is no longer needed, although it can be left in place.
3. Make sure new shaft can be rotated easily. Note with
marker where the fully open and fully closed positions will
be. Please also note that the retainer strap should apply
little or no pressure on the new damper shaft; its purpose is
simply to keep shaft secured to damper.
4. TFLB motor is already in closed position. Mount on new
damper shaft after also fully closing damper. Note where
anti-rotation bracket should be placed; mark position; and
mount anti-rotation bracket with strap bracket. See Image 3.
Can't tell if your damper is open or closed - please go to
www.RetroZone.com and click on Technical Resources.
Direction of travel of this motor is controlled by putting either
orange or gray side away from damper face to reverse
directions. As needed, stroke limiter can be moved from one
side to the other. If you need the motor in the open position,
consult "Remounting the Stroke Limiter on the Belimo TF Series Motor", included with this kit.
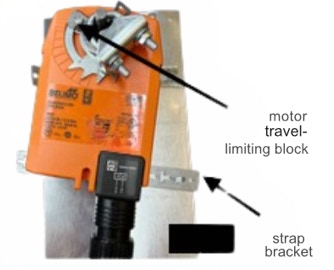
5. VERY IMPORTANT: Rotate damper to fully open position
USING POWER ONLY - DO NOT attempt manual rotation.
Then, with Phillips head screwdriver, move motor travel
adjustment blocks to stop the motor from further travel. See
Image 4.
NOTE: DAMAGE can occur to the damper if the powerful
Belimo motor is allowed to exert full force beyond the travel range of the damper.
Electrical Hook-up of Belimo TFLB Motor to Zone Control
System: Refer to zone control specific information on your
system for electrical hook-ups, However, when using the
TFLB24 Belimo Motor simply reconnect the two wires used on
old motor. Since these are AC motors, there is no polarity either
of the motor wires may be used in either position.