

![]()
![]()
![]()
![]()
![]()
![]()


![]()


![]()
![]()


Copyright RetroZone inc.2012
SECTION 4 Airzone Controllers - General Information
Specific information on individual Airzone Control Systems are included with each panel, including wiring and other information. The following information is generic to all Airzone Systems.
The Airzone Trouble Shooting Manual contains more information on how individual components work.
A. Where to locate the Airzone control panel.
B. Flexdamper actuating times.
C. Pump hook-up and other information.
D. Solenoid-Slave Zone information.
E. Thermostats
A. Where to Locate the Airzone control panel(s)
Note: Consult Section 6 "avoiding noise problems" as this section may impact locating the Airzone Central Control Equipment.
If possible, the Airzone Control Units should be mounted in a conditioned space, away from temperature extremes. Doing so will prolong the life of all components.
However, it is acceptable to mount Airzone Control Units in attics and other areas that do not exceed 130ºF.
Most Control Panels are rated for 130ºF duty, but Retrozone strongly recommends the mounting of these panels in conditioned space. This may be useful also because of the status LED lights, which can provide user feedback. It is acceptable to mount the control panels remotely from the Airzone Solenoid panel.
While all Airzone equipment should be easily accessible for service, all user inputs are from the control panel only.
B. Flexdamper Actuating Times - How fast is fast enough?
The speed at which Flexdampers actuate is dependant on several factors, including:
1. The size of the Flexdampers on each zone.
2. The length of the tubing.
3. The timing of the call to actuate - are other zones also calling?
95% of all new Airzone installations operate satisfactorily on just one pump. Should the reaction time of the Flexdampers be too slow, a second expansion pump can easily be added later.
In most cases, Airzone Central Control Equipment is located near the inside furnace/blower section of the HVAC. Keep tubing lengths as short as possible, although runs of 50 and 100 feet are common. Excessively long tubing runs will slow Flexdamper actuating times, perhaps making a second pump necessary.
Any application with more than one 12 or 14 inch Flexdamper on a zone may be a candidate for a second Airzone pump. Excessive air tubing lengths or amounts may also slow reaction times.
C. Pump hook-up and other information. See fig. 4-1
The Airzone pump is a long life, continuous duty type pump.
Pumps are designed to be powered by two 24VAC wires - one going to the HVAC transformer (as shown in fig. 4.1) the other going to the transformer powering the control panel (labeled "24VAC" in fig. 4.1). All pumps have an internal 24vac relay with three connecting wires. Wire pump as described in the inside cover panel instructions of your Airzone System.
The troubleshooting manual contains detailed information on the pump and relay, however please note:
* The black wire connects to the common wire of the HVAC's 24vac Transformer, NOT the Airzone transformer.
* The pump is designed to hang loosely from a nail or screw, over-tightening can split the rubber mounting tab.
* Heat Pumps often do not require connection of both green and red pump relay wires. It is acceptable to connect just one pump relay wire to any (24vac low voltage only!) heat pump control wire that is energized in all modes (usually the fan wire)
* In certain applications it may be necessary to run the pump continuously, simply wire the pump directly to the Airzone transformer with the common and red or green pump relay wire.
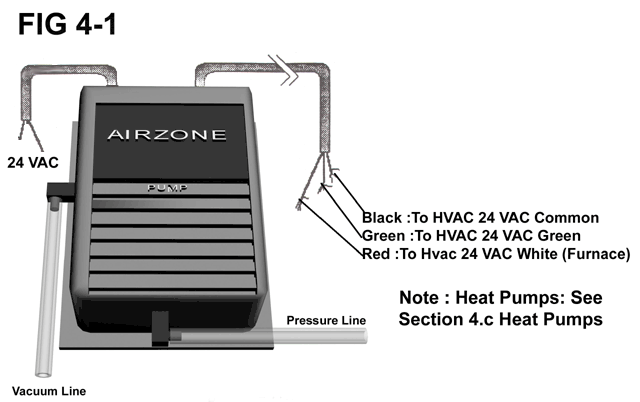
Fig 4-1
D. Solenoid - Slave Zone information. See Fig. 4-2 "Solenoid Air Switches"
CAUTION: Do not remove or tamper with the pressure and vacuum relief valves installed inside the Airzone System. These important valves must remain in the proper lines, and pointed in the proper direction.
Any Airzone solenoid can be changed from normally open operation to normally closed operation. Simply disconnect and reverse the two tubing connections to each solenoid as shown. DO NOT reverse the vacuum and pressure relief valves as severe damage to the system can result.
“Normally open" means that when de-energized, the solenoid air switch connects the vacuum line of the pump to the Flexdamper, causing it to open or remain open.
"Normally Closed" means that when de-energized, the solenoid air switch connects the pressure line of the pump to the Flexdamper, causing it to close and restrict air flow.
SLAVE ZONES- Slave zones are zones where a thermostat or a switch directly controls the solenoid/Flexdamper to simply close off airflow to an area, without controlling the HVAC system.
Slave Zone Thermostats - Use the normally closed solenoid configuration, since a thermostat will energize the solenoid when airflow to an area is needed.
Toggle switch or other slave zone control - Depending on the application, use whatever mode - normally open or normally closed (see Fig. 4-2) - that will result in the solenoid being energized the least amount of time. Retrozone recommends doing so to reduce energy use and prolong component life.
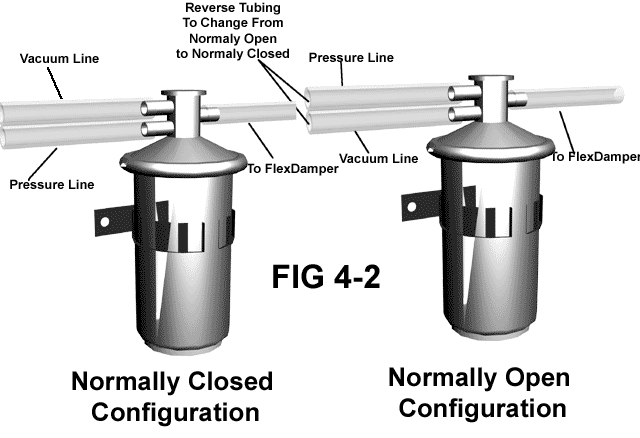
Fig 4-2
E. Thermostat Mounting Location and other information.
Correct thermostat mounting - Careful location of the Retrozone thermostats will have great importance on the comfort and energy efficiency of the HVAC unit, and can greatly reduce wiring time and costs.
Fig. 4 - 3 shows a typical floor plan of a home, divided into five zones. The thermostat for each zone should be centrally located within each zone.
The thermostat for each zone:
- should not be located on an outside wall, above a lamp, in direct sunlight, in the direct air-stream from a register, or anywhere else where a false reading may occur.
- should be located about 5 feet from the floor, in an area that receives good air circulation for that zone only.
FIGURE 4 - 3 EXPLAINED: The "T" in a circle represents a thermostat.
Wiring tip Fig 4 - 3A: Whenever possible, locate the zone thermostat on a wall shared with a closet, utility room, or other room where the thermostat wire can be run through the wall and then up the closet (or other) wall, and through the ceiling or floor. This wiring method is far easier than "fishing" wire between walls.
Zone 1 thermostat includes both the living room and dining room, and is located where the radiant heat from the fireplace will not give the thermostat false readings.
Zone 2 thermostat includes the den and entrance, and is located to sample the temperature between both. A less desirable, but easier to wire location is also shown, since the wire can be run inside the pantry. Thermostats should always be mounted in the middle of a zone, if possible.
Zone 3 thermostat is mounted between the kitchen and the breakfast nook, where the thermostat can "sample" the temperature from both areas. Also, the thermostat is located on a pantry wall, simplifying wiring (see Fig 4 - 3a) by eliminating the need to "fish" wire between the walls.
Zone 4 thermostat should be located in whichever bedroom is most used, or most sensitive - such as the case of a newborn. Mounting on outside of closet simplifies wiring (see fig 4 - 3a).
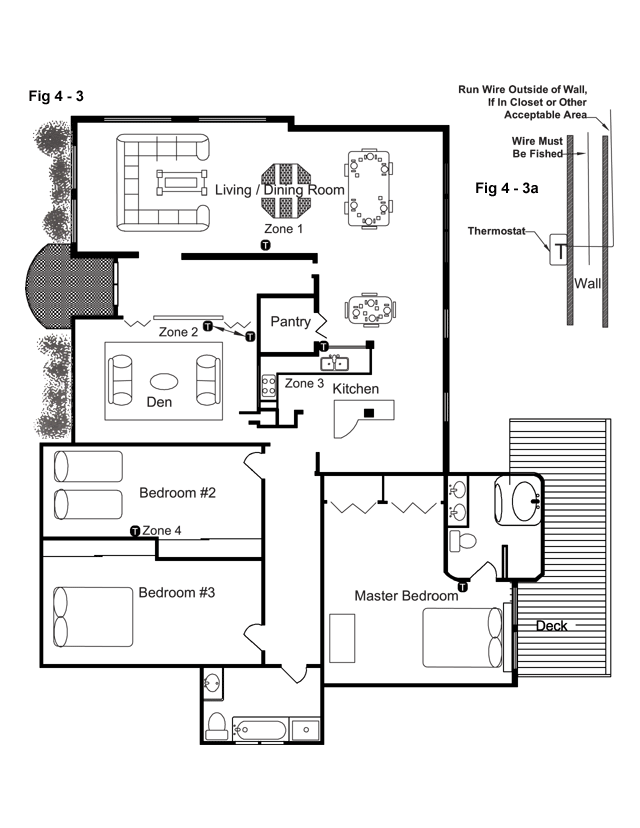
Fig 4-3
Zone 5 thermostat - Even if this was a two zone job (living - sleeping zone), the sleeping zone thermostat almost always should be mounted in the master bedroom. In this example, the thermostat is mounted in an excellent spot -
interior wall, close to the bed, AND in an area where it can "sample" both bedroom and master bath temperatures.
The same thermostat location strategies apply to commercial jobs in the same manner.
SECTION 4 OUTSIDE AIR INTAKE See Fig. 4 - 4
Forward: Often outside air can be used to provide a "free" source of cooling and ventilation into a home or office. In many parts of the country, the air conditioning is forced to run to remove sun load latent heat. Sometimes special situations dictate the need for occasional ventilation, such as Radon concentrations. The Airzone outside air option can provide an effective solution.
Basic outside air control: To selectively use outside air, the normal return air must be equipped for control by Flexdampers. In addition, a duct needs to be run between the return air plenum and an outside air location.
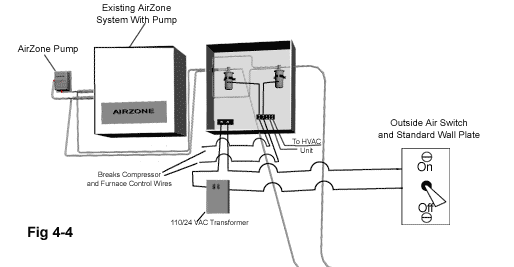

Fig 4-4 Fig 4-5
The outside air pick-up duct's (Fig. 4 - 5) length should be as short as possible. Size the outside air pick-up duct as large as possible. This will insure maximum effectiveness of outside air use.
Control Sequence: See Fig. 4 - 5
The outside air system is provided with a manual toggle switch to, when activated, provide the following:
a. Flexdamper(s) actuate to block the normal return air path while another Flexdamper opens in the outside air duct. If equipped, a vent duct would open for discharge air.
b. The 24vac control signal to the compressor and heat exchanger is blocked, preventing either from running.
c. The Airzone System remains operational, so outside air can be directed into any zone. The ability to direct all the outside air into one zone enhances the ventilation capabilities of the outside air system.
d. Advanced controls are under development; consult factory for information.
Copyright RetroZone 2013


