

![]()
![]()
![]()
![]()
![]()
![]()


![]()


![]()
![]()


Copyright RetroZone inc.2012
SECTlON 2 Rectangular Flexdampers
RECTANGULAR FLEXDAMPER INSTALLATION INSTRUCTIONS
pub 1290 Retrozone, Inc. (formerly Enerzone Systems Corp.)
The rectangular Flexdamper is designed to be retrofit into almost any existing rectangular duct, including fiberboard or steel. The unique "trim-to-fit" design insures a great fit, even in odd size ducts.
Each rectangular Flexdamper can be adjusted to fit many different ducts within its range. Consult rectangular damper sizing chart for more information

Rectangular damper sizing chart
Rectangular Flexdampers use pressure to actuate and close a duct, as well as vacuum to pull the rectangular Flexdamper blade into a fully open position.
Fig 2-1. The rectangular Flexdamper consists of a top blade that moves upward to stop the flow of air, a bottom base that does not move, a securing bracket and an air inlet valve.
An air actuated membrane in between the base and blade forces the blade upward or downward when pressure or vacuum is applied.
The metal securing bracket is a structural part of the Flexdamper, and does not necessarily require attachment to the duct in horizontal installations.
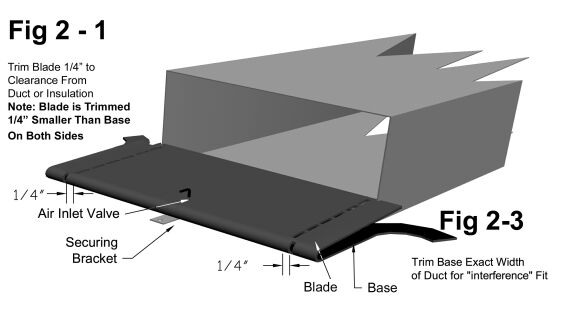
Fig 2-1 / 2-3
Fig 2-2. Height Adjustment Strap - Located on the back of the Flexdamper, the height adjustment strap limits the upward travel of the rectangular Flexdamper's blade.
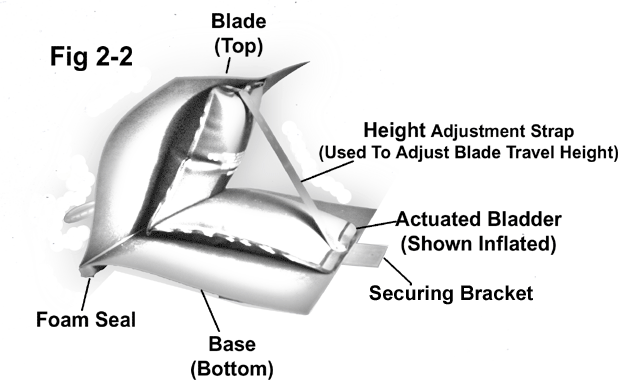
Fig 2-2
To adjust, loosen the nut on the rectangular Flexdamper blade, and select a hole on the strap that limits the upward travel of the blade to an acceptable point.
Caution! The use of the height adjustment strap is particularly important in fiberboard duct to limit the stress placed on the duct.
Fig 2-1. The rectangular Flexdamper is designed to lay in the bottom of the duct, but can also be mounted in a vertical plane on the side of a duct.
Fig 2-1 / 2-3
Caution! Read this next section on trimming the rectangular flexdamper, since you have only one chance to get it right!
Take great care to not cut or puncture the air-actuated membrane. Household scissors may be used.
Trimming the rectangular Flexdamper: The base of the rectangular Flexdamper should be cut to make a tight, interference fit in the bottom of the duct (Fig. 2 - 3).
Trim equal amounts off each side, so that the air inlet valve remains in the middle of the Flexdamper. Example: If a 14 inch wide Flexdamper is being sized to fit a 12" wide duct, trim one inch off each side.
When working with duct with internal insulation, be careful to not tear or rupture this insulation, as insulation erosion can begin.
The tight interference fit keeps the rectangular Flexdamper from moving about in the duct, and keeps the blade in proper position. The air tubing should be cut to a length to prevent the rectangular Flexdamper from moving down the duct.
The air tubing and tightly fitting base therefore keep the rectangular Flexdamper in position, so that securing the rectangular Flexdamper to the duct with the securing bracket is not necessary in most applications.
Trimming the top Blade: Trim the top blade of the rectangular Flexdamper an additional 1/4 inch more than the base to allow the blade to clear the sides of the duct.
Depending on the condition of the duct, you may have to vary this amount of clearance. However, excessive clearance will cause excessive leakage. Remember you can always trim more off, but you can't put it back on!
Fig. 2-4 Very low leakage installation: Applications desiring ultra low leakage should first install and actuate the rectangular Flexdamper. The rectangular Flexdamper should be attached to the duct using the securing bracket so there is no chance of movement.
With the Flexdamper actuated by the Airzone Control System, carefully trace the position of the blade in relation to the side of the duct from the bottom to the top of the duct (Fig. 2-5). Then let air out of the rectangular Flexdamper.
Using silicone adhesive, install the foam sealing gaskets from the Airzone rectangular Flexdamper Low Leakage kit. Slightly overlap the tracing of the blade in such a manner that the blade slightly but firmly contacts the foam gasket when the Flexdamper is actuated.
Actuate the rectangular Flexdamper before the silicone adhesive sets, and adjust the foam gaskets to a perfect fit.
Use the Airzone Control system to actuate the Flexdamper to determine the Flexdamper's exact shape when in operation. Then allow adequate time for the silicone to set.
Fig. 2-5 Mounting the rectangular Flexdamper in a vertical plane. Sometimes a rectangular duct may be run on it's side, requiring the Flexdamper to mounted on a vertical side
.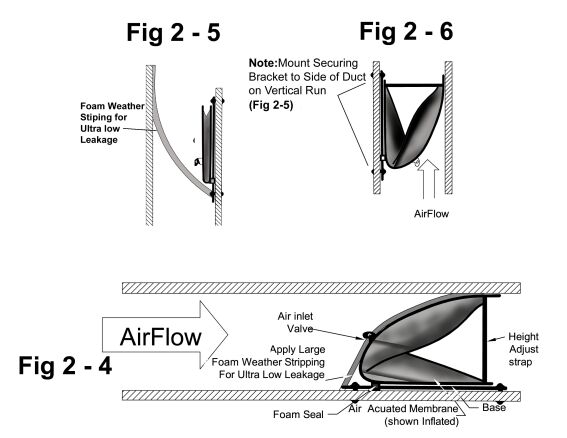
FIG 2-4 / 2-5 / 2-6
Mounting the Flexdamper in this manner is practical, although the Flexdamper should be mounted by the securing bracket. Also, trim an additional amount of material off the bottom edge of the blade to compensate for potential sag.
Fig. 2-6 Mounting the rectangular Flexdamper in a vertical duct: Rectangular Flexdampers can be mounted in vertical ducts, although mounting by the securing bracket is necessary. On those Flexdampers where the air inlet valve points downward (when Installed horizontally), the vacuum supplied by the Retrozone pump will pull the blade in place in the damper open mode. Do not mount the Rectangular Flexdamper to the top of the duct where gravity works directly against the damper blade.
Fig. 2.7 On larger rectangular Flexdampers you can fold the blade/base to allow it to fit in smaller duct hole.
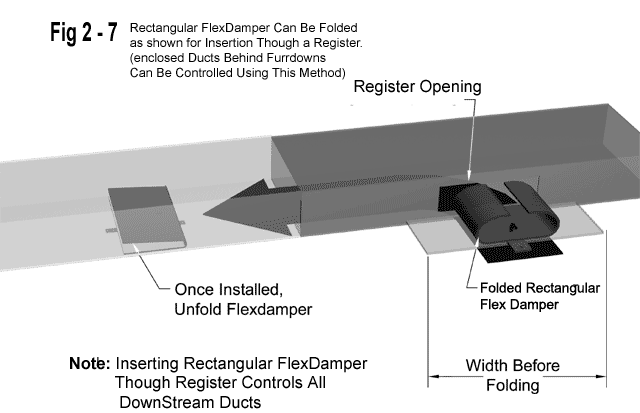
Fig 2-7
Copyright RetroZone 2013


